Introduction:
After the release of my first ZX Spectrum intro, Fluxus, I wanted to continue by making my next ZX Spectrum intro in honor of Sir Clive's 80th birthday.
Design
So for this intro I wanted to explore screen mirroring routines, which I always find kind of pleasing to the eye and brain. So at the design phase I was imagining a kind of large LED display with perfect horizontal mirrored imagery that would then again be reflected in a darker shade for the bottom third.
So I started designing the an 8x8 tile pattern that would best reflect the LED display vibe that I would copy across the entire screen at initialisation, similar to Fluxus. The actual effects would then be done via the 32x24 color-ram, with table lookups for coloring.

From my experience with Fluxus i learned that asymetrical tile patterns with some spacing can help to give the illusion of the resolution being slightly better than what is calculated. So after some experimentation I ended up with the minimal type of pattern that you see above the paragraph.
The Screen Update loop
Like Fluxus, I used a similar method of drawing 32x24 color-indices to RAM and then use the color-indexing table to pick up the index-data from VPAGE and copy it to COLORRAM using the 256-byte aligned colorindex table to remap indices to ZX Spectrum colors.
The difference now is that I used mirrored screenspace, with the bottom third using a darker shade to mimic a reflective surface. And like Fluxus, the (now mirrored) screenspace was tilted 45 degrees as well to match that White-Stripes kind of look. Mirroring the X,Y coordinates is done like so
ld a,c		; c holds x-coordinate (0..31)

add 112

jp p,storex

neg		; mirror value

storex:

ld c,a
And similary for the horizon, which also warps the space into a perspective and marks the use of the darker color shades to be used later on when mapping these from the color-index table.
ld a,b	; b = y-coordinate (0..23)

add 119		; horizon

neg

jp p,storey

ld iyl,iyh	; use reflection color

neg

rla	; divide by two perspective in reflection

storey:
Now once this drawing routine was in place, I was ready to add multiple effects similar to Fluxus.
Effects
For this intro I wanted the effects to swap in a quicker and less predictable way to make the whole thing feel a bit snappier. So instead of doing a simple bit check, I used carry-checks to switch between the 4 different effects based on a bitmasked framecounter.
ld a,ixl

and 0x55

rra

rra

jr c,effect23

rra

jr c,effect1

effect0: ; effectcode for effect 0

effect1: ; effectcode for effect 1

effect23:

rra

jr c,effect3

effect2: ; effectcode for effect 2

effect3: ; effectcode for effect 3
Where each of the 4 effects would then jump to a storepixel label that will store the calculated color-index to the ram page.

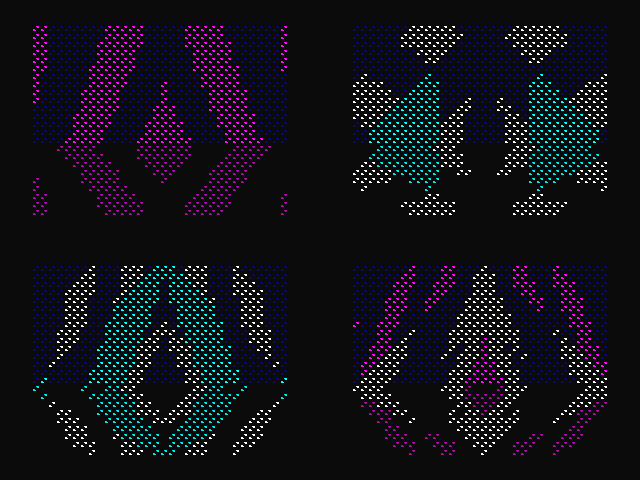
An impression of the different effects used in Clive.
So after a lot of experimentation I ended up with 4 different effects that I liked and matched the vibe that I was looking for.
Audio
To make the audio work for this intro, I made a simple soundloop that reads sounddata from the HL pointer, inverts the data (to avoid too much noise) and writes that to the different AY registers.
ld d,13 ; 13 regs

soundloop:

; select soundregister

ld  bc,0fffdh

out (c),d

; writes sounddata

ld b,0bfh

ld a,(hl)

and 15

neg

out (c),a

dec d

jr nz,soundloop
The trick was then to get a nice piece of data in memory HL that doesn't sound too bad, mask it rhytmically and output it to the sound registers as described above.
Release
So by the end of the week I had an intro running and was ready to submit to Decrunch party. It was bundled with some other/larger intros into a single category, but still managed to win the competition regardless of the smaller size.
For more information, you can download the intro at: demozoo.org