Introduction:
This intro sort of started as a challenge by F#READY who was trying to lure me into trying Atari 8-bit coding. I never had an Atari 8-bit as a kid and I didn't have the hardware as an adult either. Fortunately F#READY was able to help fix up and get me an Atari 800XE machine with the promise that I would try to do an intro for it some day.
Despite Interstate 128 being my very first Atari 8-bit release, this was actually the very first intro that I finished.
Design
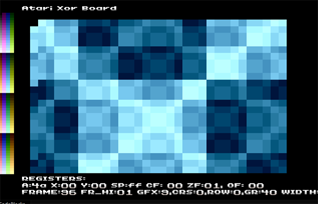
Having done a parallax checkerboard on the ZX Spectrum before, I figured this would make for a nice effect to try on the Atari 8-bit. Also it was a great excuse to add some 6502 support to our test framework and freshen up my 6502 skills in the process.

Using our test framework was a great way to slowly transition the effect from C to 6502 code, which I think helped me with my very first intro.
Visuals
Since this was going to be a realtime effect ment that I was most likely going to use one of the character modes. So after trying a few of the character modes I decided to use Screen 9 character mode, which will give me 4x1 sized pixels with 8 luma values in a single hue range. I also enabled the 32 column mode to limit the amount of characters that i needed to update (32 instead of 40 for each line).
Next up was generating a set of custom tiles at $4000 for each of the luma values. Since I didn't straightup wanted to fill the upper and lower nibble with the same luma value ment that I flip nibbles for each byte to get a very simple dithered pattern. Sadly this is quite costly to do on a 6502 CPU given how the ROL/ROR operates.
 ; swap nibble

 ASL

 ADC #$80

 ROL

 ASL

 ADC #$80

 ROL
Custom charbase is then set to $40 (highbyte representing location $4000)
Because we are not working on a bitplane based system, we need to calculate the color for each of the chunkypixel character-indices. The process for this goes something like this.
Init color

Init offset

Init counter

layerloop:

   * Add offset to x/y for parallax movement

   * Perform bitwise operation with x/y

   * Perform bitwise operation with value and color

   * Shift back scalar

   * Shift back counter

loop while not carry

Plot final color
Values are written directly to the screen by using sta (ADRESS),y with ADRESS being increased by 32 at the end of each line.
Optimisations
To save some space on code I'm using the systems ADRESS ($64) zeropage variable directly and then
using the ROM routine SET_ADDR ($F9A6) to set/reset the screen adress each frame.
Other optimisations include using the attract mode to handle the automatic cycling between colors, which worked out well in combination with using Screenmode 9.
Audio
When it comes to audio for this one, there is not a lot to say. I simply used the F#READY approach
of inserting a sta $d01f at different parts of the code until you find something that
doesn't sound too horrible.
Obviously given its small size not the best piece of audio the hardware can produce, but it gets the job done of adding some atmosphere to the entire thing.
Release
Thanks a lot to F#READY for getting me into Atari 8-bit coding. I've grown to love and appreciate the system a lot! After having released Blueprint for the ZX Spectrum the previous year, I thought it would only be fitting to release this intro at Outline 2022.
For more information, you can download the intro at: demozoo.org